Okta Workflows lets you build your own user provisioning for any app that exposes an API — even when there is no pre-built integration.
This blog post uses Shopify as an example. Shopify supports SCIM-based provisioning, but only on Shopify Plus — its most expensive plan. If you are on a lower-tier plan, you can use Okta Workflows to create, update, and delete Shopify customers automatically based on user lifecycle events in Okta.
Provision Users
The Automatically Sync Shopify Customer Identity template handles three lifecycle events:
- User added to an Okta group → create a customer in Shopify
- User profile updated in Okta → update the customer in Shopify
- User removed from an Okta group → delete the customer in Shopify
Before you begin
You need:
- Okta org with Workflows
- Automatically Sync Shopify Customer Identity template
- An Okta connection configured in Workflows
- A Shopify connection configured in Workflows
- Custom Okta user profile attributes (see next section)
Add the Automatically Sync Shopify Customer Identity template
- Go to Templates in Workflows.
- Search for Automatically Sync Shopify Customer Identity.
- Click Add template, then follow the steps to select a folder to add the template to.
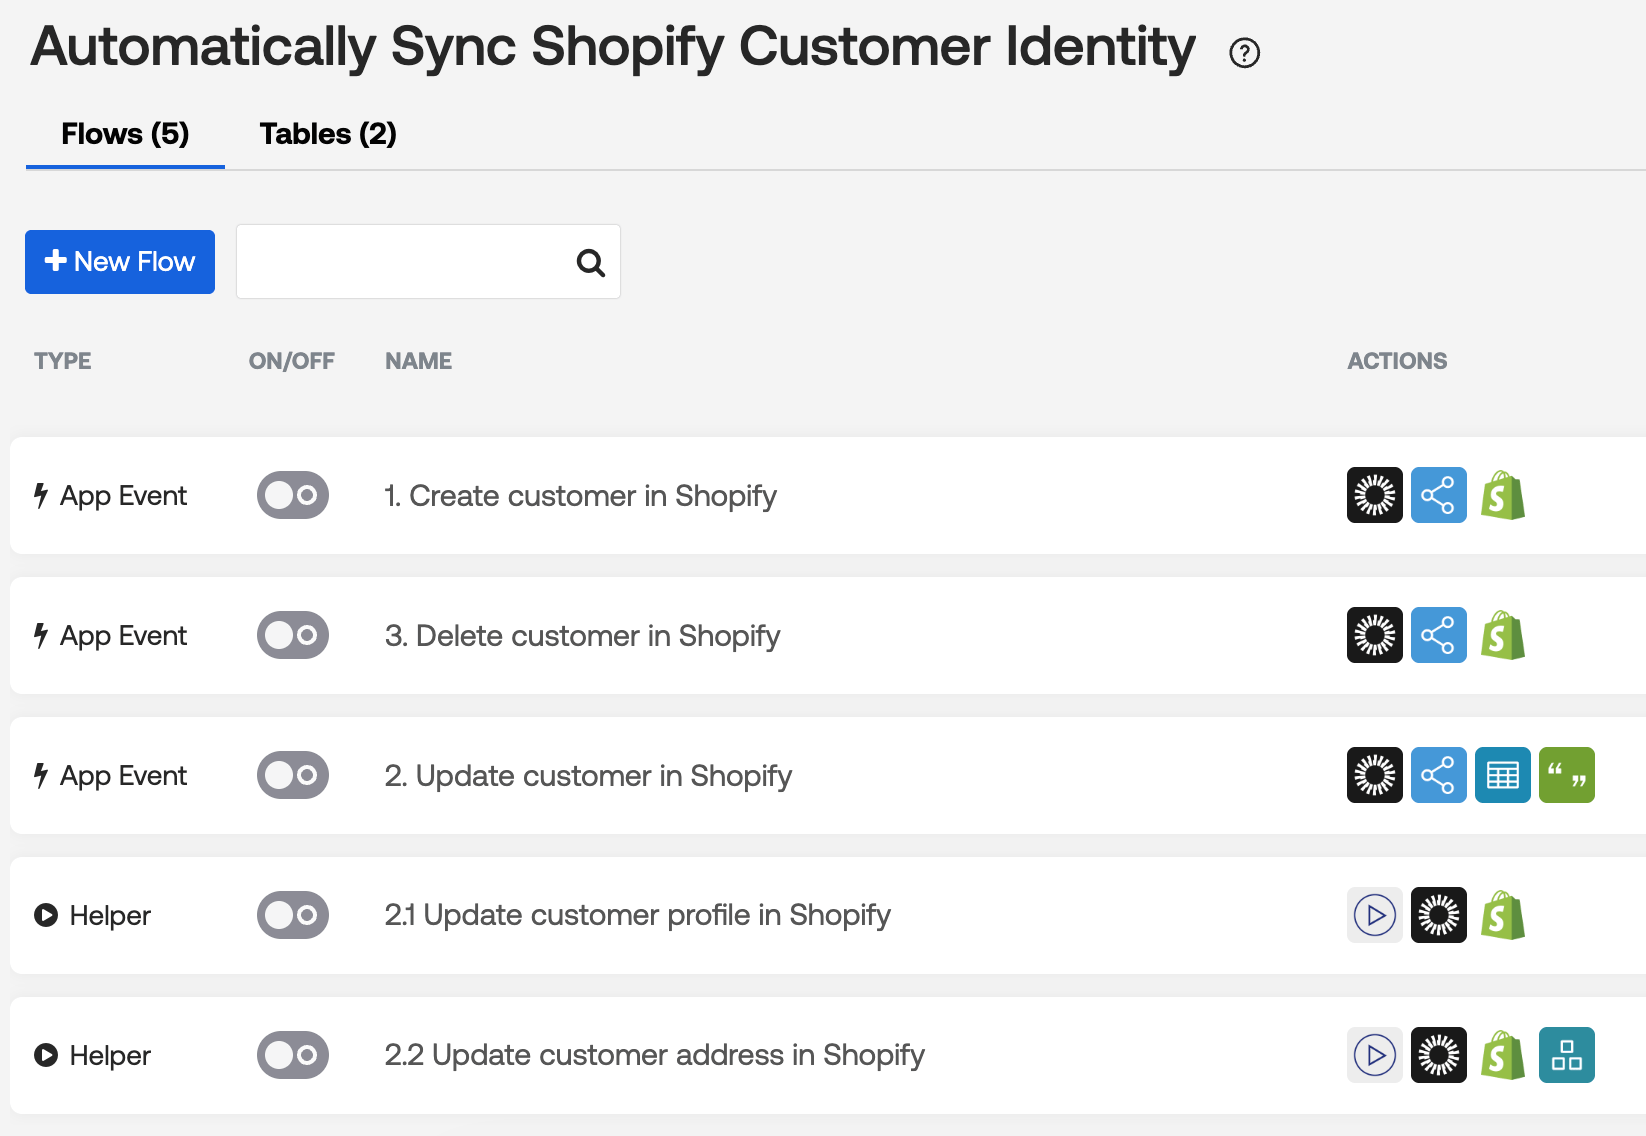
The template adds five flows and two tables to the selected folder:
Create custom profile attributes
The template uses custom Okta user profile attributes to store Shopify-specific data. You need to create these attributes in your Okta user profile before using the template.
| Attribute | Description |
shopify_customer_id | The customer’s ID in Shopify |
shopify_default_address_id | The ID of the customer’s default address in Shopify |
shopify_accepts_marketing | Whether the customer accepts marketing emails |
shopify_tax_exempt | Whether the customer is tax-exempt |
shopify_tags | Tags applied to the customer in Shopify |
Flow 1: Create a customer in Shopify
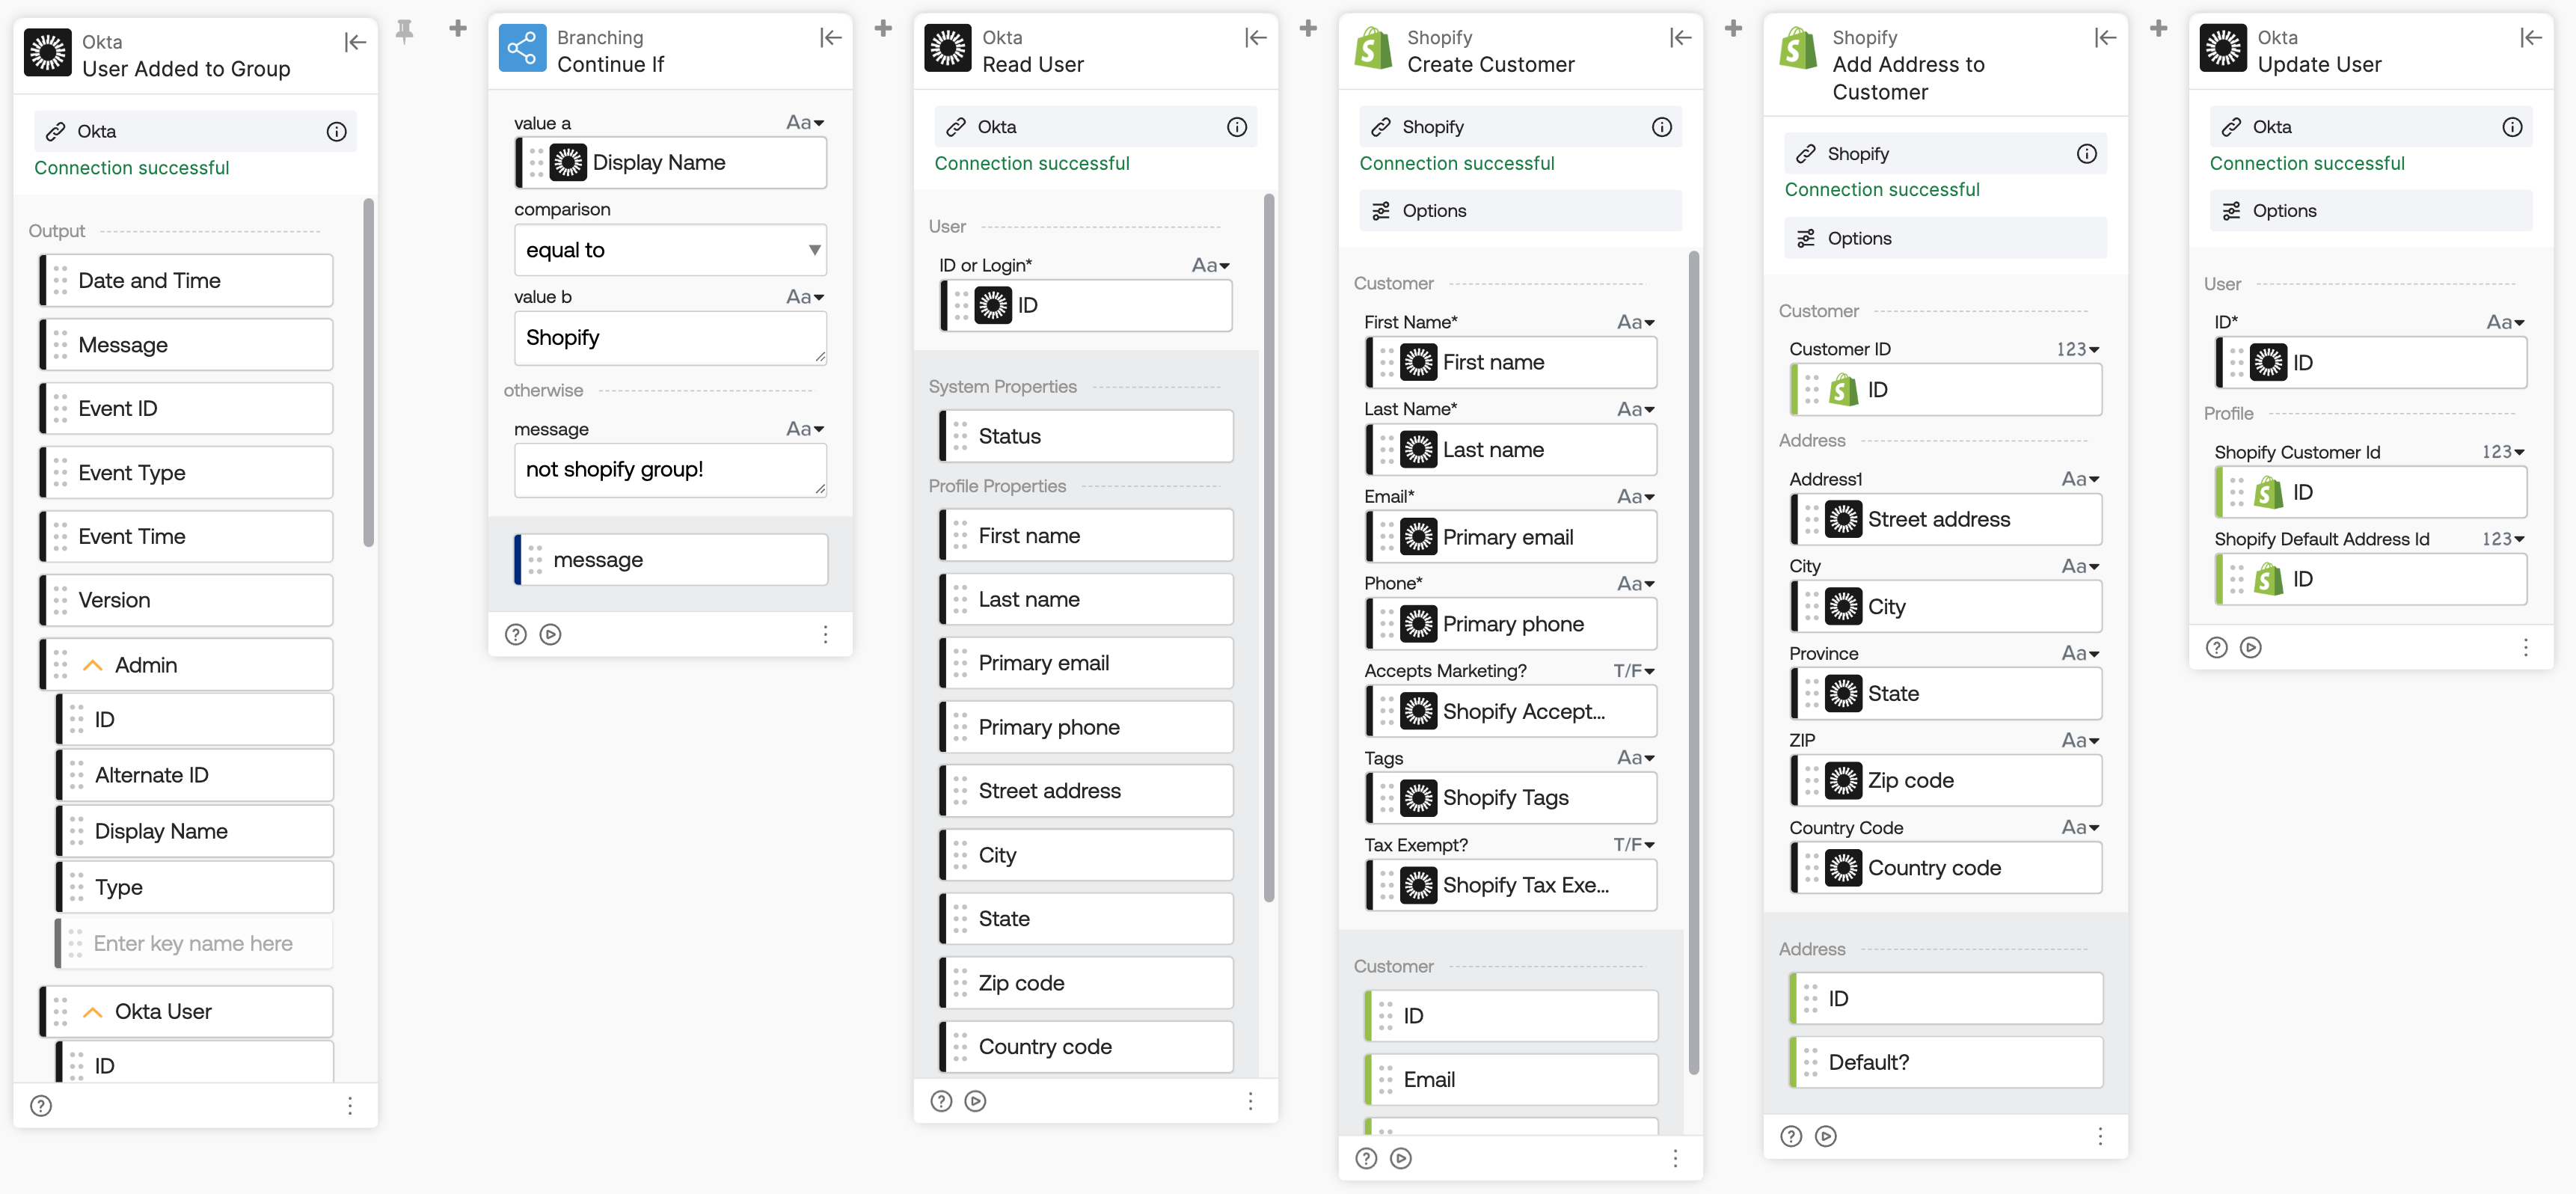
This flow runs when a user is added to a specific Okta group. It creates a new Shopify customer and saves the Shopify Customer ID to the Okta user profile.
How the flow works
- Okta — User Added to Group event triggers the flow when a user is added to a group.
- Continue If checks that the group name matches the target group. The flow stops if it doesn’t match.
- Okta — Read User action retrieves the user’s profile, including name, email, phone, and address.
- Shopify — Create Customer action creates a new customer in Shopify using the user’s profile data.
- Shopify — Add Address to Customer action adds the user’s address to the new Shopify customer record.
- Okta — Update User action writes the Shopify Customer ID back to the
shopify_customer_id attributeOkta user profile.
Flow 2: Update customer in Shopify
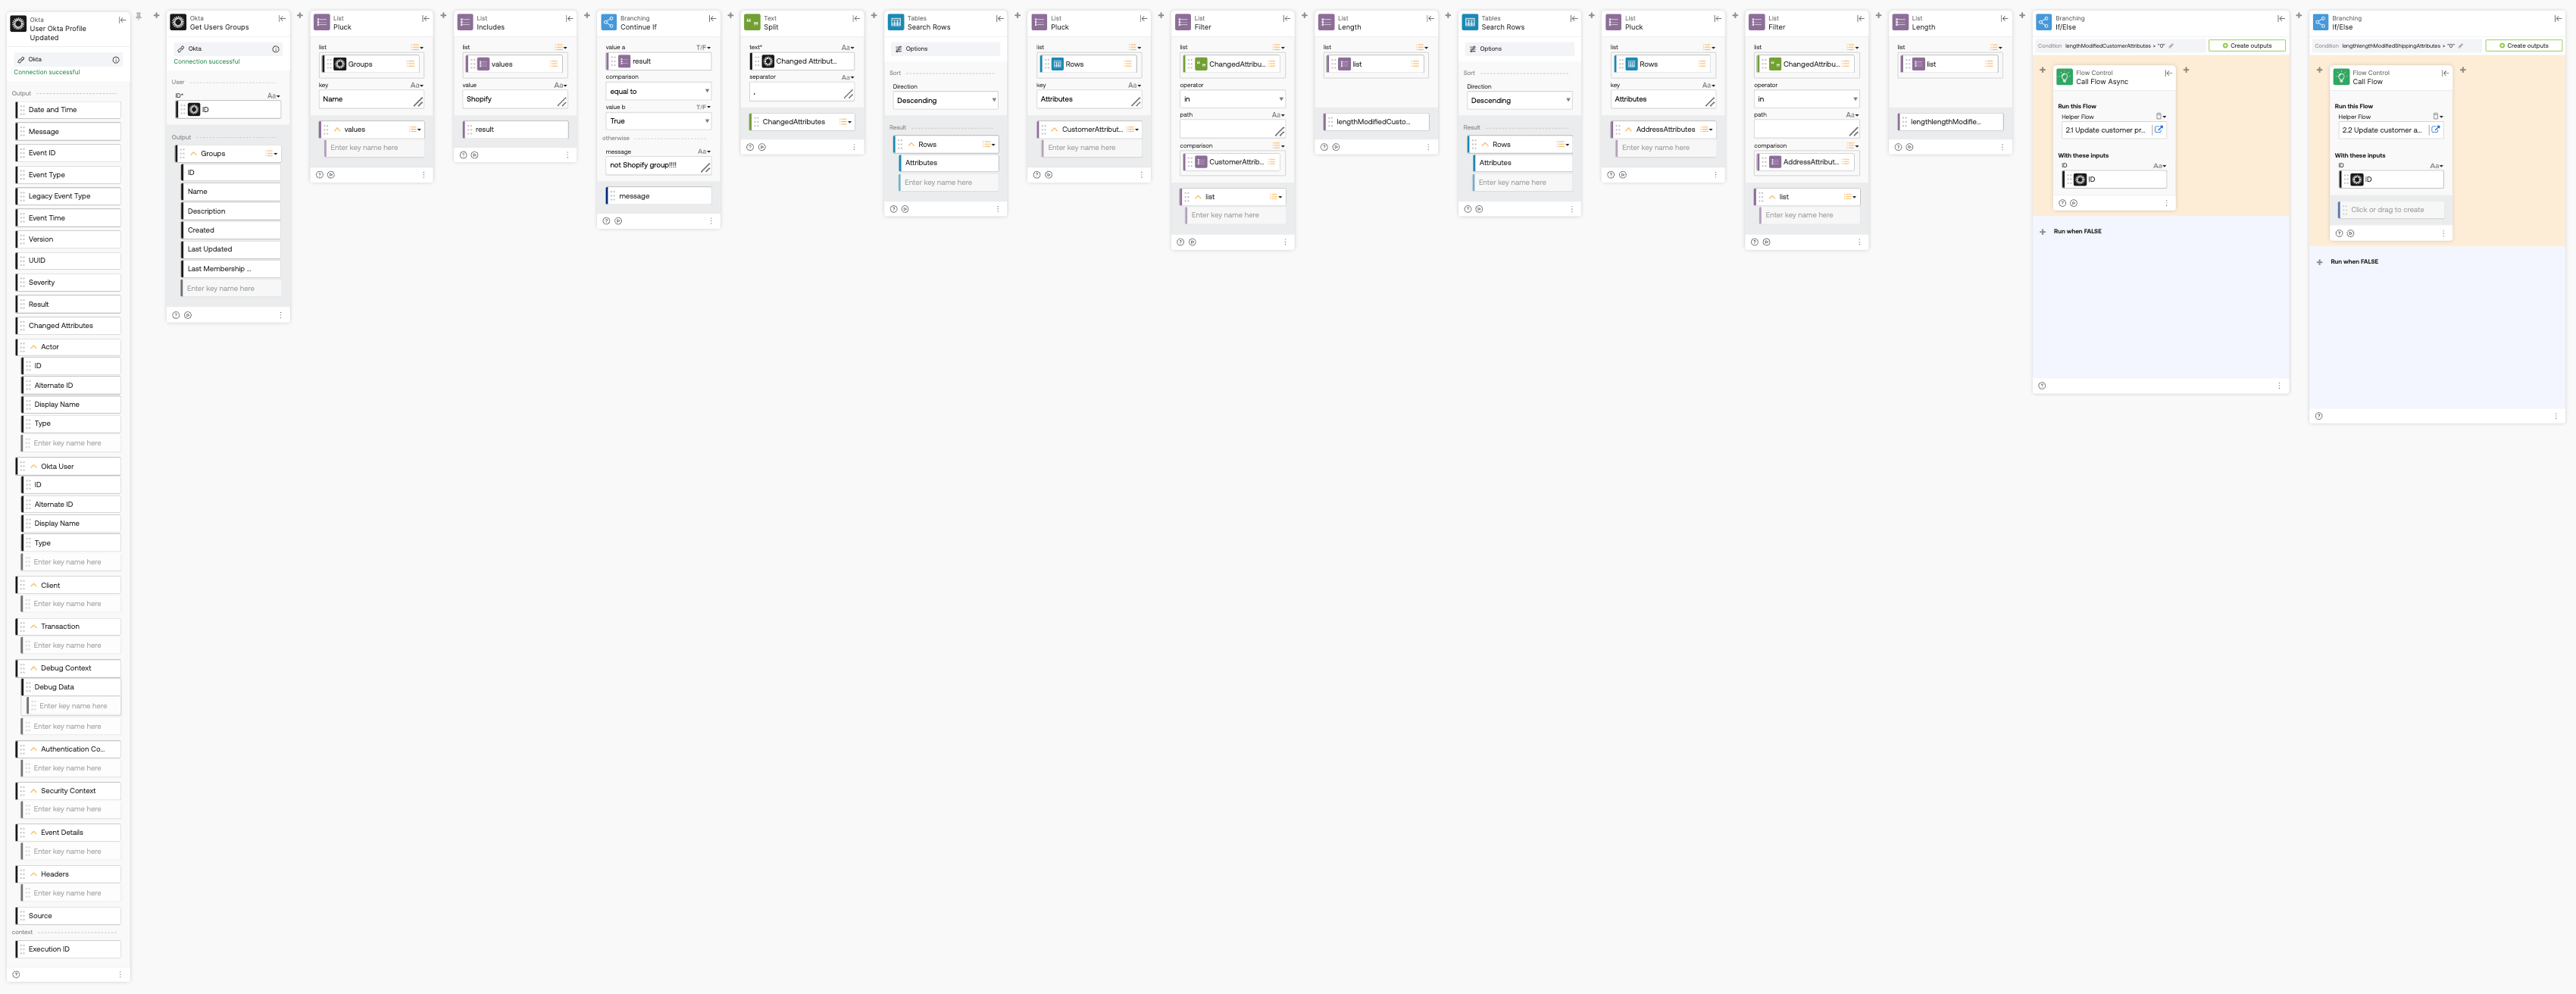
This flow runs when a user’s Okta profile changes. It calls two helper flows to update the customer’s profile and address in Shopify separately.
How the flow works
- Okta — User Okta Profile Updated event triggers the flow when any profile attribute changes.
- Call Flow calls Flow 2.1 to update the customer’s profile in Shopify.
- Call Flow calls Flow 2.2 to update the customer’s address in Shopify.
Flow 2.1: Update customer profile in Shopify
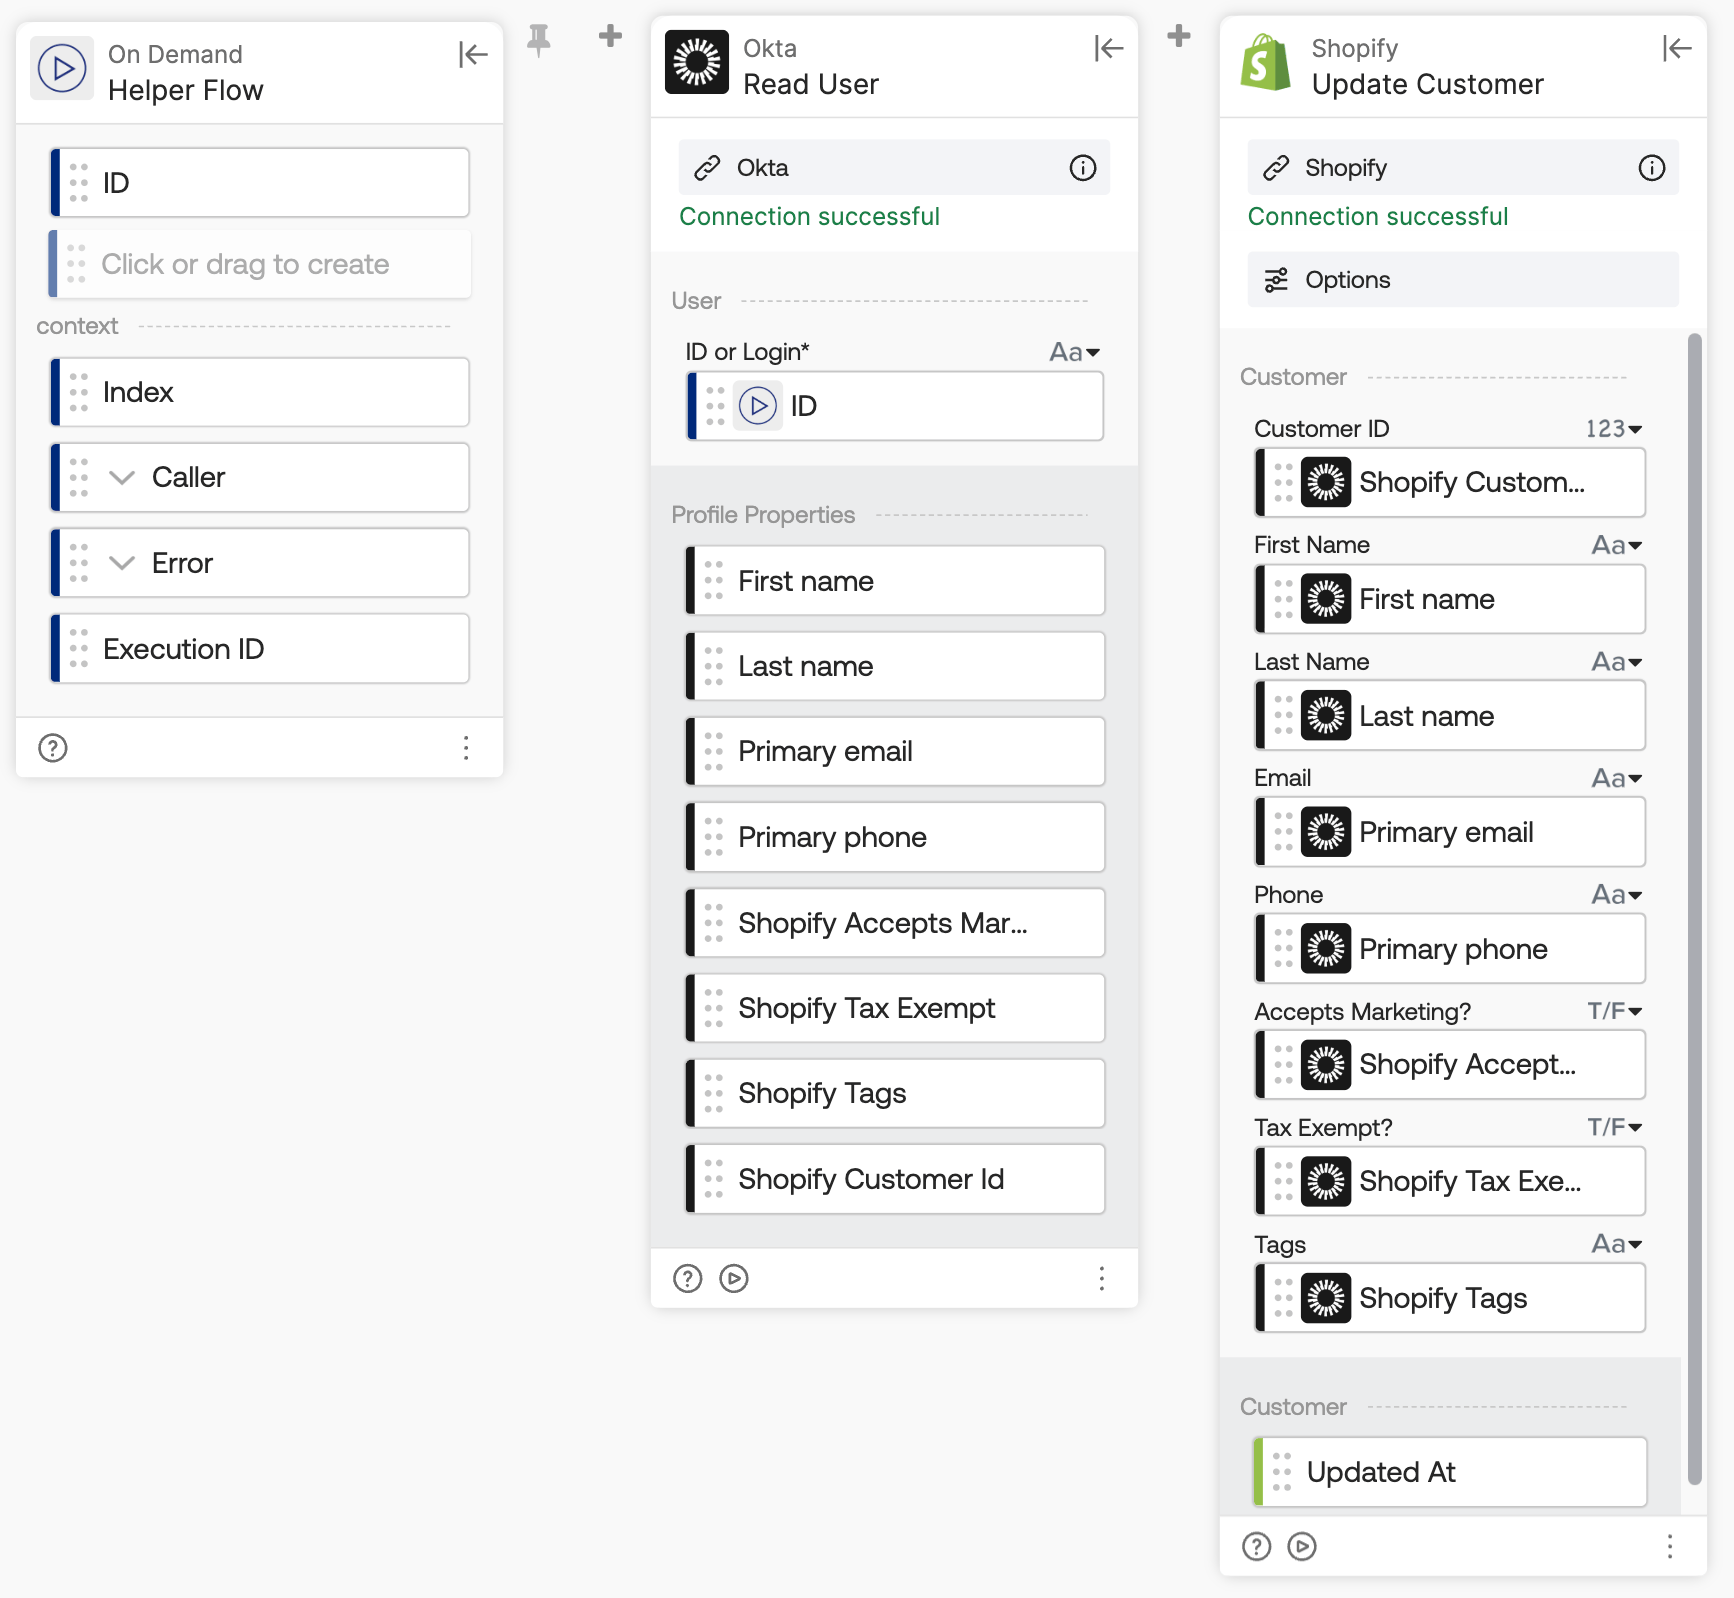
This helper flow updates the customer’s core profile fields in Shopify.
How the flow works
- Okta — Read User action retrieves the user’s current profile, including name, email, phone, and Shopify-specific attributes (
shopify_accepts_marketing,shopify_tax_exempt,shopify_tags,shopify_customer_id). - Shopify — Update Customer action updates the customer record in Shopify with the retrieved values.
Flow 2.2: Update customer address in Shopify
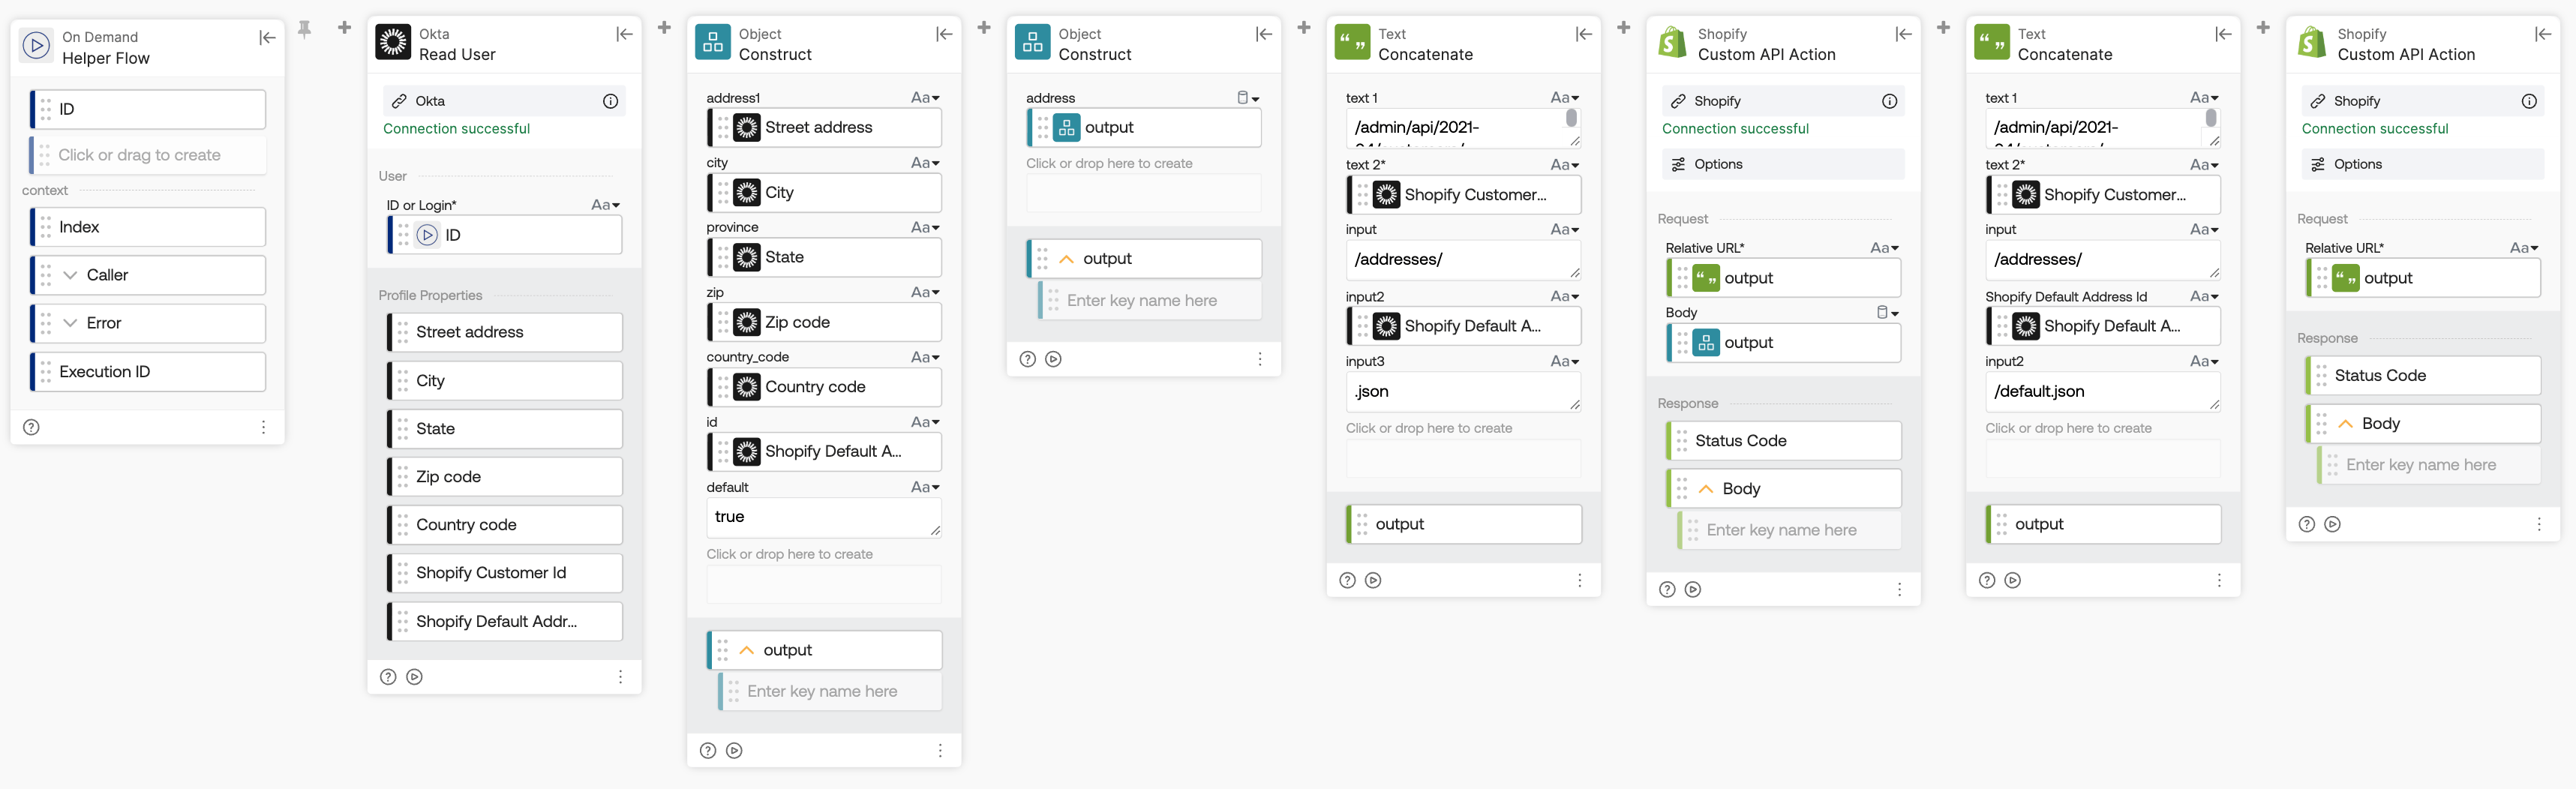
This helper flow updates the customer’s default address in Shopify. Shopify doesn’t expose address updates through its standard Update Customer action, so this flow uses the Shopify REST API directly via the Custom API Action card.
How the flow works
- Okta — Read User action retrieves the user’s address fields (
streetAddress,city,state,zipCode,countryCode) along withshopify_customer_idand shopify_default_address_id. - Object — Construct function builds the address payload — an address object with the field values wrapped in an
addresskey, as required by the Shopify API. - String — Concatenate function builds the relative URL:
/admin/api/2021-04/customers/{shopify_customer_id}/addresses/{shopify_default_address_id}.json. - Shopify — Custom API Action (PUT) sends the address update to the Shopify REST API.
- String — Concatenate function builds a second URL: /
admin/api/2021-04/customers/{shopify_customer_id}/addresses/{shopify_default_address_id}/default.json. - Shopify — Custom API Action (PUT) marks that address as the customer’s default.
Flow 3: Delete customer in Shopify
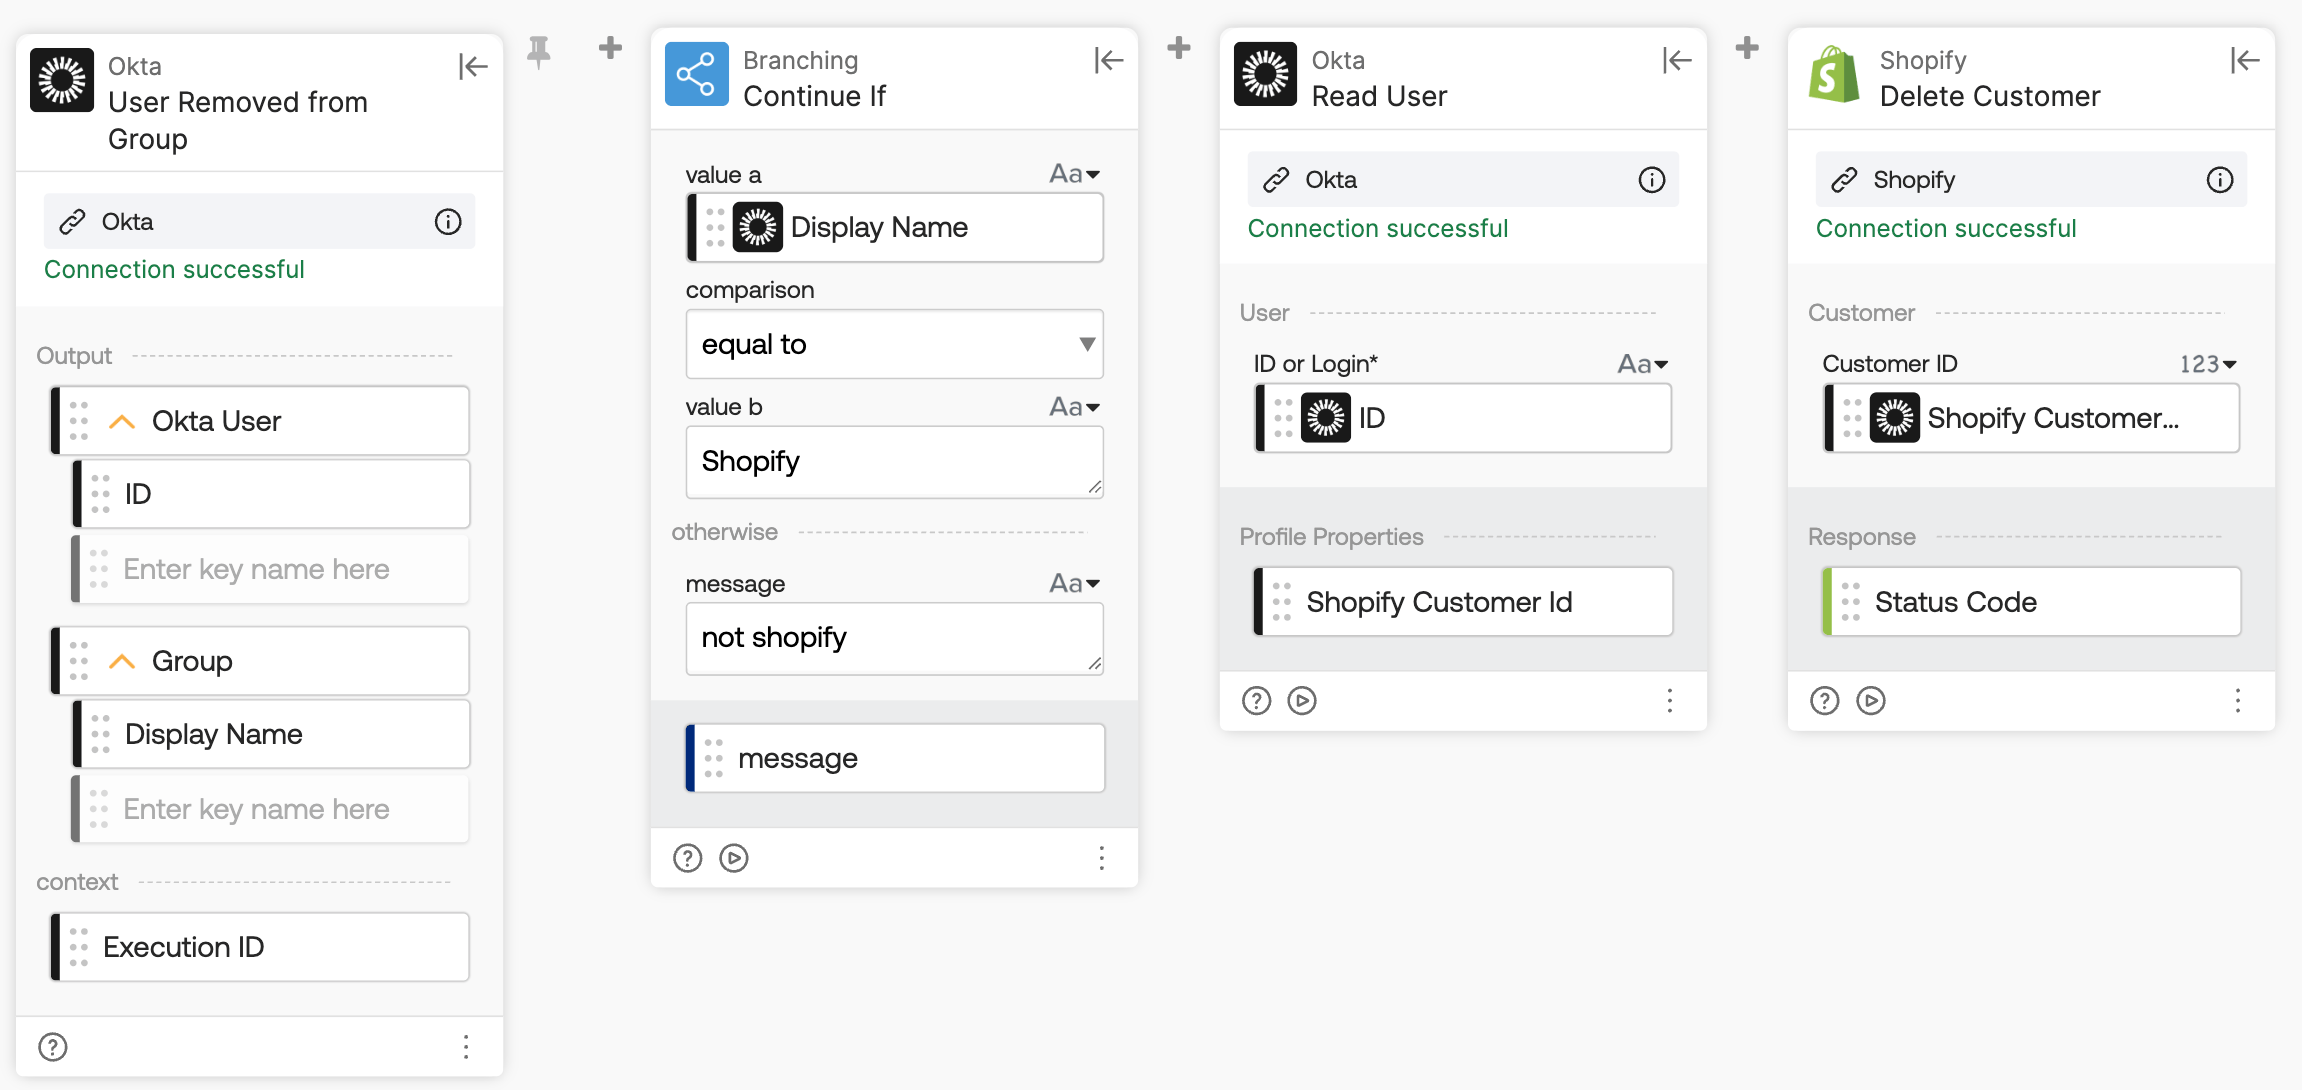
This flow runs when a user is removed from the Okta group. It deletes the customer from Shopify and clears the Shopify Customer ID from the Okta user profile.
How the flow works
- Okta — User Removed from Group event triggers the flow when a user is removed from the group.
- Okta — Read User action retrieves
shopify_customer_idfrom the user’s profile. - Shopify — Delete Customer action deletes the customer from Shopify using the stored ID.
- Okta — Update User action clears the
shopify_customer_idattribute from the Okta user profile.
Summary
You can use this same pattern — lifecycle event → API call → store the ID — for any app that exposes an API. When a pre-built integration is unavailable or doesn’t fit your plan, Okta Workflows gives you the flexibility to build your own.
More resources
- 🚀 New to Okta Workflows? The Getting Started with Okta Workflows page has all the resources to help you get started.
- 📺 Like learning from videos? Watch Okta Workflows videos.
- ❓Have a question? Ask during community office hours or post on the community forum.
- 💬 Want to learn from the community? Join the #okta-workflows channel on the Mac Admins Slack.
- 🎓 Want to learn more about identity automation? Take the Okta Workflows training on Okta Learning.
Leave a Reply